Some weeks ago I went down to the marina to run up the engine, as I do religiously every week. By now the days in New Zealand have gotten fairly chilly, but I was still surprised when my near new Westerbeke 35D3 (400hrs) took 7-8 long seconds to fire, despite holding the glow plug button for well over 15 seconds.
This problem has continued since, and I initially considered that the colder weather was demanding longer glow plug times, but 10 seconds or 30 seconds, it made no difference.
I checked the glow plugs for increased resistance, but they all checked out OK. So if there is good heat in the plugs, and plenty of air, then it must be fuel.
- It must be noted that once the engine starts, it runs like a top.
- It should also be noted that the initial attempt at starting takes a considerable amount of cranking, but if you then stop, turn the key off and try again, the engine starts instantly.
One night last week I was pouring through the electrical schematics for the engine and control panel when I came to understand how the overall pre-heat and starting systems work.
The 35D3 has a low-pressure electrical lift pump that pressurizes the fuel system before the engine starts, then keeps pumping fuel toward the main injector pump as long as the oil pressure stays constant.
What caused the light to go off in my head is that the glow plug button on the Admiral Panel sends power to the "Pre-heat solenoid", and this solenoid does 2 things...it activates the glow plugs, but it also activates the electric lift pump.
- When I depress the glow plug button, I do NOT hear the steady clicking that I should from the electric fuel pump (!)
IF the solenoid wasn't working, or IF there was a bad connection to the lift pump, then there would be no fuel pressure waiting upstream of the injector pump for starting. Several seconds of cranking would cause the injector pump to pull fuel toward itself, and then it would fire easily on the 2nd attempt, which is what I have found in practice.
I will use the electrical schematic (
http://www.westerbeke.com/Products/ProductWiringDiagram.aspx?ID=1275) to look for 12v from the lift pump all the way back to the glow plug button on the panel. If I have 12v all through, then I'll follow Westerbeke's advice and whack the pump with a mallet (seriously...this is in their manual).
I'll update this post as I work through this problem.
4/7/13 - UPDATE
I spent some time last night onboard with my multimeter chasing the fault at the lift pump, which I can confirm is not working when the start-up procedure is followed.
I confirmed that the pre-heat solenoid is indeed functioning, there is a loud click when the glow plug button on the panel is depressed.
The lift pump has only two wires, a 12v hot lead and a ground (
earth). The 12v lead is connected to the pre-heat solenoid with a spade connector.
I pulled this apart and put the positive probe of my multimeter on the lead coming from the solenoid. I grounded the negative probe against the engine block (
a clean spot of metal). I set the multimeter in the companionway in such a way that I could observe it as I turned the ignition key and depressed the glow plug button.
Instead of getting 12v, I got a reading that varied between 3v and 4v. This is my first indication that the lift pump may well be capable of working, but is not getting sufficient voltage. I can confirm this tonight by bring my small 12v spare motorcycle battery down to the boat and energizing the lift pump directly.
Normally in the past when I see anything less than 12v, I immediately suspect corroded wiring or connections, as voltage drop is the first sign of increased resistance. I am also wondering if the 10amp breaker that resides on the solenoid terminal (
see part group #20 on the parts diagram below) is faulty. Testing for 12v just before this point will confirm.
I do suspect that this will prove to be a 2-person job.
UPDATE
I stumbled across this account of a very similar situation at another owners website (
http://aboardastraea.com/). It is VERY interesting in that this owner also expereienced 3.96v at the downstream side of the solenoid (I mention above that I was reading between 3 and 4v).
It seems that for the realtively-low cost of a new solenoid, I should give it a try.
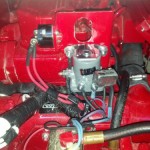
Las weekend when we were anchored in Glorietta Bay the engine was hard to start. When you start our engine first you turn the key on, then an alarm sounds. Next push the preheat button and the alarm turns off, the glow plugs heat up and the fuel pump comes on. In Glorietta the alarm never turned off and the fuel pump didn’t come on. Solenoids are easy to troubleshoot. There’s a 12VDC input at two places, one is the high current input on the left copper post, and the activation is the bottom left small post labeled “S.” When 12VDC is applied to the “S” post it activates the internal mechanism completing the circuit, essentially electrically closing the switch and allowing electricity to flow from the left side to the right.
 During troubleshooting I verified that the 12VDc was available on the input. On the output side the large post was 0VDC and the small post was 3.96VDC. I individually disconnected each load on the right side to verify. That they weren’t loading the solenoid down and found the 12VDC never goes all the way through. I looked the part number up in the Westerbeke manual (part number 024639) and found it online for $42 plus shipping and handling. Fortunately, the solenoid is the same as for a 1967 Ford Mustang so I bought it at O’Reilly’s Auto Parts for $24! Thanks to my buddy Vince for knowing that solenoid off the top of his head. I installed the new solenoid last night and it works perfectly now!


