Tuesday 14 September 2021

Galvanic Isolator Fun!

Although my marina employs isolating transformers for shorepower,  I wanted the assurance of having total galvanic isolation.


I purchased a Zinc Saver isolator rated up to 100amps (double what is required). 

I will install it about a foot from the shorepower socket on the GREEN or 'earth' wire.

I've had to fix a plywood block to the hull side in the engine room to fasten the isolator securely.  The block is 3"x4" and is held in place with 3M 5200.


I wanted to test the unit before installation.  Here is the process courtesy of Galvanic Isolator UK


Testing a Galvanic Isolator with Stud connections

testing a marine galvanic isolator with a multimeter
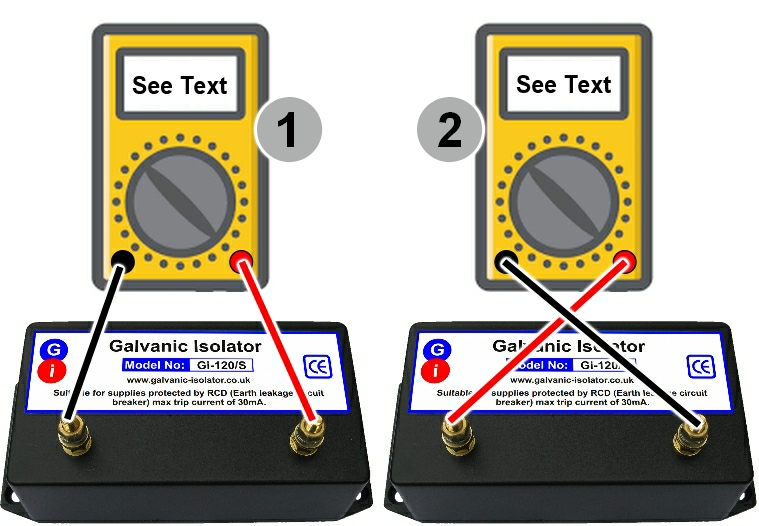
To test a Galvanic isolator with connecting studs...

1). Set the multimeter to the Semiconductor Test or Diode Test position, and attach one crocodile clip to each stud. Wait 5 seconds then note the reading on the meter. The reading will typically be between 0.9 (Volts) and 1.6 (Volts). 

2). Now reverse the connections. Wait 5 seconds then note the reading. Your Galvanic isolator is OK if the reading is similar (within about 10%) of the previous reading.


My readings were 9.7v and 9.4v in either direction. 

I'll install it by carefully cutting the outer cover, cutting the green wire and fixing heat shrink marine terminals to both ends.  Fix the terminals to the posts and it's done.


Monday 13 September 2021

Brand new '62!

I'm thinking ahead now to creating some new cabin cushions.  I think I'll find some thicker/firmer foam and fabric to brighten and modernise the look.

Of course, poverty being the mother of invention I've been scouring the country for a sewing machine to replace my Adler (Old Adler)  (sold some years ago in a downsize).

I've found this 1962 Pfaff 145, a medium duty commercial machine built for canvas and heavy fabrics.

I plan to mechanically restore it and replace the high speed clutch motor with a low speed/high torque servo motor.  This is a conversion I did with the Adler as well.

The table will need a coat of paint on the top, frame, and pedals.

An initial cleaning of the machine with kerosene before pulling it to pieces for accurate setup will complete the project.

Update: 22/8/21

I've decided to peel off the old laminate and paint the wood surface below  Heavy sanding and wood plugs in all the old holes. Seal with epoxy, filler, primer and paint.

I wanted to use paint that I had at hand, so the top is gloss white enamel and the frame is GOLD! This will take some getting used to.
Installed 550w DC servo motor.  I love these motors...quiet, programmable, and HUGE torque.


12/9/21

It's complete and working! I needed to time the needle, but as you can see it's now stitching wonderfully!