Monday, 9 December 2013

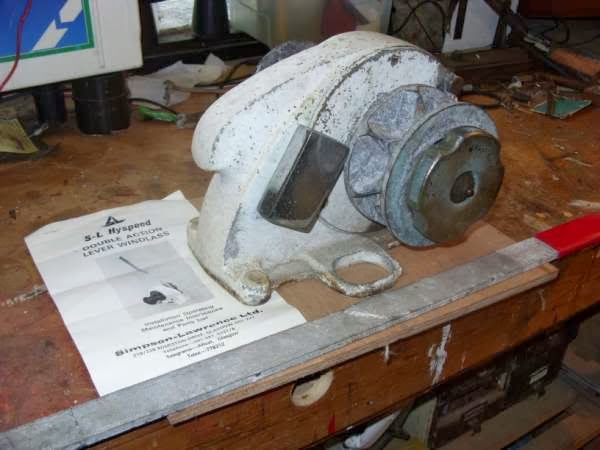
Simpson-Lawrence SL Hyspeed Windlass Restoration

The manual windlass at the bow of my boat has always bothered me.  I never use it, but it was in bad visual condition, and being so obvious, I think it said something to the passing public...something like "this boat is in decline".

So with the brilliant weather that November brings in the Southern Hemisphere, I have decided to restore it.

For some unknown reason, I failed to take a "before" photo, so I found one on the internet that represents the condition it was in before I started:

Thank you to the owner...whoever you are...mine was actually worse, paint coming off in large flakes.


I will shortly upload an "after" picture, which will show the result of careful disassembly, stripping, sanding, priming and painting.  It has turned out very nice.


For anyone considering the same project, here is a link to the original owner's manual:

http://www.lewmar.com/%5Cassets%5Cimg%5Cdataset%5CManual-S-L%20Hyspeed-D1021-1.pdf

UPDATE 7/12/13

It's all back together, looks good. I caulked the seams after this photo was taken. 


Wednesday, 20 November 2013

Painting the rest of it...

I suppose once you venture down this track, you are somewhat obligated to see it through.

I've begun painting from the engine room bulkhead back, pulling bundled wires and hoses away as I go, cleaning and scrubbing with a mixture of Simple Green and Sugar Soap.  I'm still priming everything with the magic sauce I found earlier (Zinsser Bulls Eye 1-2-3 primer...which I am convinced you could use to prime a pan of bacon fat).

Painting around the engine is challenging, and will eventually require specialist tools, such as a paint-brush with the handle cut off, an extended roller, and several artist's brushes.


One coat of primer.  Note the vertical face 90 degrees opposite the Racor filter.  This will be the location of my new fuel-polishing/fuel redundancy system.


UPDATE 11/11/13

A HUGE amount of work...just priming it all is almost too much, to think I have to go back twice more with the top coat is unthinkable.  I am using an artist's brush and long handled brushes to reach up under the cockpit coaming and get around all the wiring and hoses...wow....don't do this...live vicariously through me...


Update 20/11/13

First coat of gloss enamel on the starboard aft section...very awkward and tedious work.   Note the original battleship grey colour to the right of the autopilot ram. 


UPDATE 2/12/13

I can't quantify or prove this, but I swear with 50% of the area under the cockpit now painted, particularly the area around the engine, the noise coming from the engine has been dramatically-reduced.  The thickness of the primer and 2 coats of enamel must be functioning somewhat like the noise-reducing paints you see advertised (Silent Running) to quell vibration.  It is really quite obvious.
I am beginning to wonder if actually using the proper noise-reducing paint wouldn't be such a bad idea.  It's not cheap, but neither is the purpose-built sound-insulation.
Wednesday, 23 October 2013

Dorade box construction project

I've got a situation on deck where the starboard dorade box is looking a bit tired and dated, and on the port side all I have is a temporarily-patched hole where once there was a califont stack.


Existing dorade.  The spider cracking on the deck is made more noticable by the application of Capt. Tolley's Creeping Crack Cure - a wonderful gift from the gods.  Won't see it under the KiwiGrip and Perfection!


I have decided to use the existing dorade as a pattern to create two new boxes from some teak timber I located locally. 

The first step was to create some patterns from the existing, using a set of dividers to scribe the arc of the fore and aft pieces, which follow the cabin top. 


These three patterns represent the base of the dorade box.  The end piece is interchangeable between fore and aft.  I was surprised to find that the starboard and port faces are almost perfectly-vertical, but the end pieces (fore/aft) are canted inward slightly (perhaps 5 degrees).  This means that the long side pieces are actually parallelograms, not rectangles.

I did not measure the top piece, as this will simply be constructed to fit the base.  I will say however, that I will be using teak, not lexan, for the construction of the lids.  I know why they used lexan originally (there is a solar-powered vent inside the dorade), but it isn't a good look, and I beleive properly-costructed passive ventilation will be better than the current set-up.  The solar powered vent does not function (they ALL breakdown eventually as the rechargeable batteries wear out), and the intake vent itself is far too small.

I am preparing to use a scoop like this one:


 Update 24/8/13 - Construction

The teak timber I am using is probably thicket than required, but it's what I had and it will be extremely-robust.

A very good quality jigsaw makes short work of cutting out the pieces once they have been laid out with the patterns

You may see 5 end pieces instead of 4...there will actually be six when I'm done, 2 of which will be shortened vertically to become baffles.

You pay good money for teak flour at the shops...don't throw it in the bin!

Initial fit-up, lots of sanding and fine-shaping to be done.

What the picture above doesn't capture are the multitude of compound angles and miters involved with building this dorade box.  Because the end slope inward, and because the cabin top is curved, almost all edges needed some form of shaping.

I'm sure there is a tool in the New Yankee Workshop to do this, but I reply on my razor sharp hand plane as I always have:

Did you know that Ron Hickman, the inventor of the WorkMate, also designed the Lotus Elan?  Black & Decker have sold over 30 million of them around the world.  I have owned 3 myself.

For some unknown reason I touched the piece with wet fingers just before taking this photo...I suppose it was to show you the grain...yeah..that's it...
UPDATE: 23/10/13

I've glued one box together and checked the fit on the boat.  It needs some tweaking and a lot of sanding, but given the various compound angles and such, I think it has worked out fairly well so far.  Now I need to buy a dozen teak plugs and devise a method of securing the boxes to the deck.


These halyards and reefing lines will be shifted inboard a bit when I install the new deck
organizer


Tuesday, 1 October 2013

Refinishing salon table

When I realised the salon/dining table was going back in (although not having it creates a lot of space, it seems necessary to have), I decided to refinish it.
I'll post some pictures of the process, but its essentially sand 320 grit, 4 coats varnish (gloss), light sand between coats. 


Update: 1/10/13

Attention to detail:  Refinishing the hardware associated with the table, though aged and worn, it shines up pretty well.  You will note that I have revised my methodology to satin-finish.  Once again gloss didn't look right in the cabin.


There are a lot of surfaces, lots of careful sanding and prep.


The old hardware is worn, but it shines up well.  Even the screw heads benefit from a few seconds on a polishing wheel